Sharing another five easy-to-prep and fun-to-do activities which are perfect for preschoolers.
A few tips...
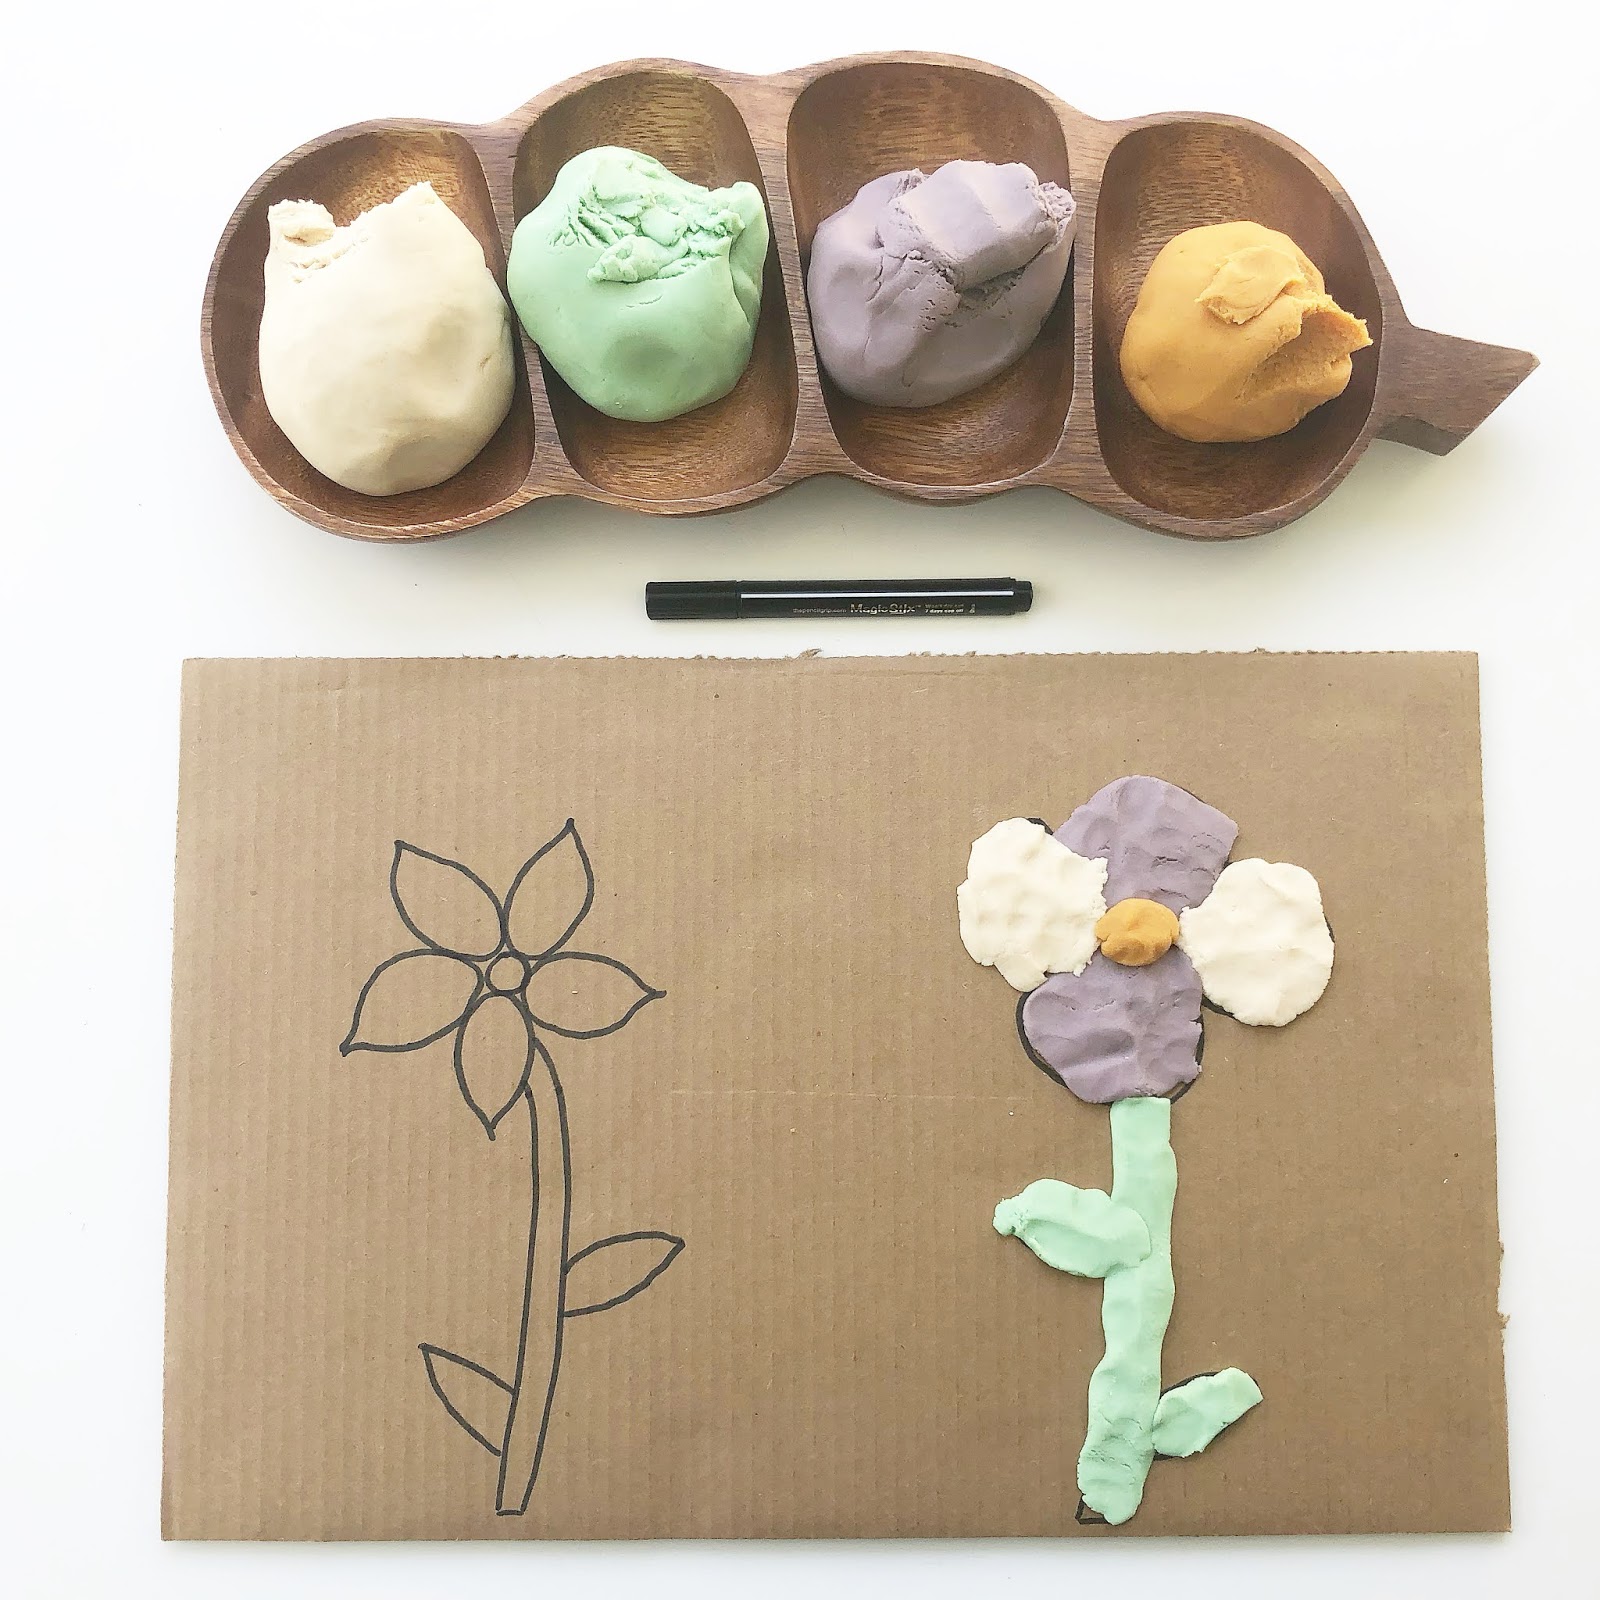
If you can, try to take your preschooler's passions into consideration when planning activities. I've always found that my kids are a lot more likely to engage with an activity if I have focused it around something they like. For example, with the play dough picture, baby sis is really interested in flowers at the moment and spends hours picking them in our back yard. With that in mind, I knew she would love the opportunity to design her own flower with different colors of play dough. Another example is that she is loving playing with building blocks at the moment. For this reason I included an activity which used building blocks. Little things like this go a long way with preschoolers!
1. Play Dough Picture

I first saw this idea on @hotcoffee_creativekids and @cara_florence and loved it! Thanks for the inspiration.
What you need: piece of cardboard, black marker and a selection of play dough.
How to set up: choose a picture or scene and draw the outline on the cardboard with the black marker. Present the play dough on a tray of some kind.

How it works: instead of using markers to add color to the picture, invite your child to use the play dough. This is great for fine motor skills and sensory exploration. Their little hands will have to work hard to tear and squish the play dough into the correct shapes. Encourage lots of conversation as they decorate their picture and allow them the freedom to choose colors. I intentionally did not offer a tool such as a knife for cutting the play dough. I think it encourages more hand work and creativity to just shape with the fingers.
For younger kids: if your kids are younger try to keep the picture which they are decorating much simpler. For example, just present them with shapes to fill with the play dough.
For older kids: make the activity more challenging by creating a more detailed picture, or even asking them to create the picture themselves. You can also turn it into a color by number but using play dough instead of a marker or paint. Head to @hotcoffee_creativekids and @cara_florence to see great examples of how this can be done.
2. Bath Bomb Water Mixing

What you need: bath bombs (ours came from Dollar Tree), a bin with water in, some containers / jugs, graters or safe knives, chopping board, droppers and spoons.
How to set up: I set this up in our mud kitchen as it was a lovely day, but you can just put out the materials on a table or the floor.

How it works: this set up is very open-ended and all about sensory play. My 3 yr old loves all things water play, especially when we are adding something to the water. Bath bombs are a really cool way to add more sensory fun to water play. They are usually quite soft and can easily be grated. My kids both love using the hand-held graters to make small flakes which they mix into the water. Here you can see baby sis happily mixing the different aroma bath bombs to create her own new aroma. The smell was lovely! Lots of fine motor skills and open-ended sensory exploration happening with this one.
For younger kids: keep things a little more simple by just letting them drop the whole bath bomb in a big bowl of water. They can stir it in and scoop up portions of their lovely smelly water into containers.
For older kids: with a project like this you can make it a little more structured for older kids by adding in some literacy and numeracy. Turn the set up into a role play shop where they have to create new potions or perfumes with the bath bombs. Ask them to price their product as well as naming it.
3. Pinch-and-Build Towers

Thanks to Planning Playtime for inspiring this set up.
What you need: building blocks and a set of tongs.
How to set up: this really doesn't require any set up, just put the blocks and tongs out on a flat surface.

How it works: as I mentioned at the start of the blog, baby sis is currently really into her building blocks. She loves just building with them, as well as playing follow-the-leader and building together with me. This idea by Planning Playtime is such a great way to make building blocks that little bit more challenging. Simply ask your preschooler to only build using the tongs, no hands. It took baby sis a little while to get used to it, and there was definitely some frustration at the start, but she soon got the hang of it. A really good way to work on engineering and fine motor skills... and patience!
For younger kids: using tongs might be a little bit too challenging for tower building so why not simplify it and just ask your little one to scoop building blocks from one bowl to another.
For older kids: add in some extra numeracy by turning it into a game of roll, pinch-and-build. Simply take it in turns to roll a dice, add that many blocks to your tower using the tongs, and then the next person has their turn.
4. Seek, Find & Draw

What you need: muffin tin, post-it notes, markers and pom poms.
How to set up: put colored pom poms into each muffin tin compartment (I did 1-6 with a different color in each compartment). Place a post-it note over the top of the tin sections. Put out the corresponding color markers to the pom poms.

How it works: my 3 yr old has been doing well with her 1-10 counting and can often be found drawing circles or crosses on paper and counting them over and over. I thought she'd have fun with this seek, find and draw challenge. I asked her to lift off the post-it note to one compartment at a time. She told me the color of the pom poms and counted how many there were. I then asked her to draw them using the correct color marker onto the post-it note. She was then very happy to get to stick the note back on and hide the pom poms. She really liked this because there was an element of surprise and she loved the novelty of the post-its!
For younger kids: there's a great variation of this for younger toddlers and even babies which just involves putting toys or puzzle pieces in the muffin tin compartments and covering them with a post-it note. Little ones love taking off the note and finding a toy!
For older kids: you could add a more challenging numeracy element to this by placing two different color pom poms in each compartment and asking your child to write a simple sum, or even just draw it. For example, 2 green + 3 blue = 5 total.
5. Kitchen Utensil Printing

What you need: kitchen utensils such as a spatula, masher, slotted spoon etc., white card, plate and acrylic paint.
How to set up: simply squirt some paint onto a plate and set out the utensils and card.

How it works: this is one of my go-to process art activities because it never fails to engage my preschooler. The novelty of being let loose with large cooking utensils really puts a smile on her face! Just invite your kiddo to stamp the utensil in the paint and then onto the page. Discuss the different markings left by each utensil and experiment with some color mixing as well.
For younger kids: even younger kids will love this! Be prepared it might get messy though. Using a larger piece of paper from a butcher paper roll will help younger artists to make a great masterpiece.
For older kids: you don't need to change a thing! As I was doing this with my 3 yr old, my 6 yr old came out and asked to have a try as well. There is just something so intriguing about making utensil prints!
Thanks for coming to take a look at this week's activities. I hope they bring some smiles and creativity to your family.
No comments :
Post a Comment